I originally started this blog in order to post a Bonus Lesson for the Joanne Sharpe, Color Love 101 class and then decided that it would be an excellent way for me to hone my skills and share that experience with others. I have always had the desire to create with paint, paper, metal, found objects or anything else that happens to make its way into my art pieces.... whether it be a painting, assemblage, or piece of jewelry. It is my hope that this blog helps to inspire others to find their joy in creating masterful pieces of art.
Before I go on, I must thank all those very, very talented artists out there who so generously share their art processes and techniques with anyone who has the desire to learn. You have inspired me to try different art tools and techniques, to be BRAVE and EXPERIMENT......that there are NO RULES! It is because of YOU that I am a better artist today! Thank you....and I hope that I can pass this on by sharing my techniques and processes with those who also have the desire to learn.
So let's get started and share our experiences together....our JOY OF ART!
COLOR LOVE 101, BONUS LESSON#37 - MAKING FAUX WASHI TAPE
Making your own Washi tape is a great way to coordinate the tape color and pattern to your pages. It is a lot cheaper than store bought Washi tape and you can obtain different effects and make tape for specific applications. You can make tape that is semi-transparent or opaque, tape just for decoration or tape that is sturdy enough to withstand punching and stitching. Part two of the lesson, making "She Art" girls, will explain some of the differences.
Are you intrigued by my reference to "She Art?" Come back next Tuesday to see how we are going to use tape to make "She Art." Hope you enjoy this lesson!
LET'S MAKE FAUX WASHI TAPE
I am not going to reinvent the wheel here, Julie Ebersole for Ellen Hutson has a very good video to show you how to make your own Washi Tape and Ellen even sells the Sookwang Tape to make it. Hooray!!! And....they have all the different widths! I am so excited because I ordered mine off the internet and it took over two weeks to arrive. I later found out it came all the way from Japan!
Watch the video and then I will go over the different tape options for making the tape.
In the video Julie uses Be Creative Tape, AKA Sookwang tape, which is a double sided tape that is semi-transparent when covered with a transparent or semi-transparent tissue. One advantage to using the Sookwang tape is that it will tear if you want the end to look torn as opposed to a cut end. Be warned!! This tape is very sticky and cannot be repositioned like the real Washi tape. So where you stick it...it is stuck forever!!! Sookwang tape is my choice for making faux washi tape that is closest to the real thing.
TWO ALTERNATE TAPES:
The two tapes pictured below are tapes that you should be able to find at your local hardware or big box store. Both tapes come in 1.41" width which can be cut down if you prefer a narrower width. I like the narrower width if it is for decorative purposes but I leave it as is when using it as a binder to join two journal pages together.
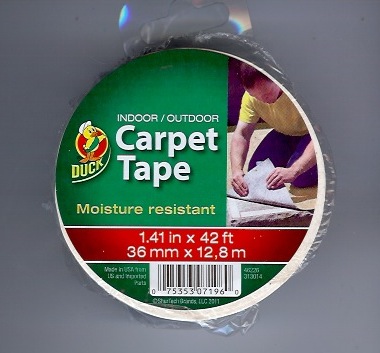
The first tape is a tape that I buy from Ace Hardware: It is a very thin plastic, double stick carpet tape that costs about $4.50 a roll. This is a nice general all purpose tape that will work well for decoration and for binding your own journals. Although, I would not use it for stitching the spline of a journal as I believe that once it is pierced, the tape will continue to tear. This tape is very sticky and unlike the Sookwang tape, it is opaque and will not tear. However, it is possible to fake torn ends by cutting it in a haphazard manner. Here is a picture:

Here is a picture:
WHAT KIND OF PAPER TO USE:
I prefer a good white tissue paper if I am going to color and doodle, stamp or stencil my designs. You can even use printed paper napkins which I will explain and show how to use later. The tissue paper that I use is just ordinary gift wrapping tissue (not the shiny kind). You may want to first do a test strip to make sure that your paper and pens are compatible and that the ink does not bleed. Not all tissue paper is of the same quality. Of course you can use pre-printed tissue paper, fabric tape, or thin wrapping paper. The choice is up to you. Experiment!
GENERAL TIPS:
- Do not use paints with a high water content. Water is not compatible with tissue paper.
- Don't worry if the tissue paper has small wrinkles in it after you stick it to the tape. Just burnish them out by using the back of your fingernail.
- Do make tapes for writing text lines. Consider plain, lined notebook and grid paper.
- Try punching borders on tape. (Tape from Walmart does not punch well.)
- Use Odorless mineral spirits or Gamsol to clean the glue off your scissors.
DOODLED AND ZENTANGLED TAPE:
Just like the video shows, I stick a strip of white tissue paper to the sticky side of the tape and trim it. Then using alcohol markers like Copic, Letraset Promarkers or Prismacolor markers, I color the length of tape with the background color. Next, I doodle or zentangle the design using Pitt, Micron, gel pens, Zig or alcohol markers. Don't forget gold and silver paint markers. It's just that simple!
Here are a few of the doodled and zentangled tapes I that made:

STENCILED TAPE:
Just like the doodled tape, I start by making the tape with the tissue paper and then color the background color with alcohol markers. That is, if the background is to be other than white. In order for the stenciled color in the next step to show, make the background a light to medium color. Next, position the stencil over the tissued tape and using a Ranger Distress Ink Pad and a soft natural brush, swirl the brush over the ink pad and then over the stencil. You can layer several stencils and colors over the tape this way but keep in mind that where the inks layer, the colors will mix.
Note: Do not wash your brush between colors. Water is not compatible with the tissue paper. To clean the brush between colors, wipe the ink off the brush by brushing it onto a paper napkin.
Here are a few of the stenciled tapes.

USING PRINTED PAPER NAPKINS:
Using printed napkins is so much fun and even LESS time consuming than making the doodled or stenciled tape. And I promise you that you will become hoarders of NAPKINS! I have a friend that I trade napkins with or my addiction would be worse. Hey! What about a napkin swap or tape swap? Anyway, back to the instructions. Paper napkins come in two or three ply and first need to be separated before sticking it to the tape. An easy method of doing this is to use two pieces of tape and stick a "handle" to each side and pull.

Once separated, just stick the printed napkin to the sticky side of the tape and trim.
Here are a few of the tapes I made by using napkins:

STAMPED TAPES:
I won''t go over how to make stamped tape as I think the video does a excellent job of that and don't forget that you can stamp and then color part of the design with markers for an awesome look!
COMING UP NEXT.....WHAT ARE WE GOING TO MAKE WITH OUR WASHI TAPE?
The remainder of the lesson is to be posted on August 28th. Come back even if you didn't get a chance to buy tape supplies. This lesson will work with store bought Washi tape or even cut strips of paper and glue. Stay tuned........